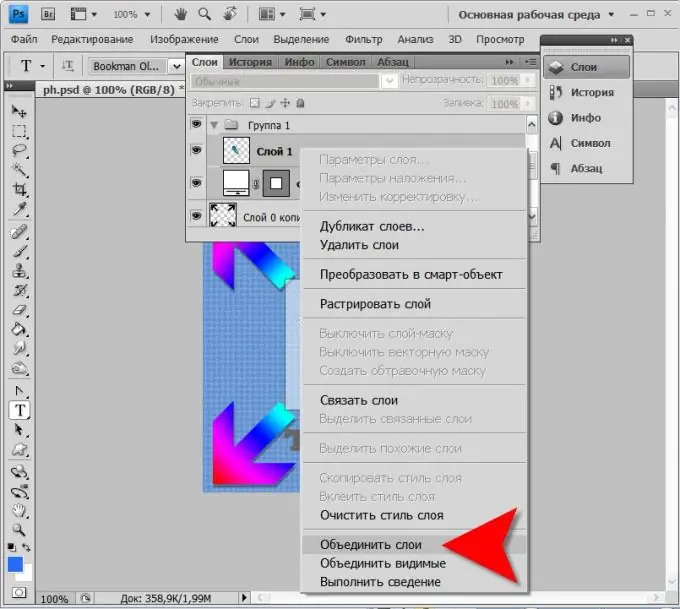
All operations with an image in the graphics editor Adobe Photoshop are carried out in layers, and the more complex the document is, the more often it becomes necessary to combine two or more "layers" into one. To do this, the graphical editor provides several different methods that differ both in the sequence of actions and in the result.

Necessary
Graphic editor Adobe Photoshop
Instructions
Step 1
Open the layers palette. This can be done by opening the "Window" section in the editor's menu and selecting the "Layers" item. You can simply press the hotkey assigned to this action - F7.
Step 2
To merge two adjacent layers, right-click the one in the list above and select “Merge with Previous” from the context menu. This operation corresponds to the keyboard shortcut CTRL + E.
Step 3
If you want to merge layers that are not adjacent, then first select all of them - click and click while holding down the CTRL key. Then right-click any of the selected layers. In the context menu, select the Merge Layers command. Pressing the hotkeys CTRL + E will perform the same operation.
Step 4
If you want to merge all visible layers, then right-click any of them (not the text layer) and select Merge Visible from the menu. Hot keys that can also be used for this operation are CTRL + SHIFT + E.
Step 5
To leave only one layer in the document, including all the visible ones, right-click any of the layers except the text layer. Select the line "Roll up" in the context menu. If the document contains invisible layers, the editor will ask for confirmation - it will show a dialog box with the question "Delete hidden layers?". Click "Yes" and all visible layers of the document will be merged into one, and the invisible ones will be destroyed.
Step 6
You can link layers without merging them into one. After such an operation, any actions with any of the layers of the bundle will be broadcast to all the others. To link layers in this way, select any of them, and click the rest with the left mouse button to the right of the layer thumbnail - an icon of several chain links will appear in this place. You can do it differently: select all the layers you need by clicking them with the mouse while holding down the CTRL key, and then click the leftmost icon ("Link Layers") in the row at the bottom edge of the layers palette - it shows the chain links.


