The graphics editor CorelDRAW provides the ability to enter text. Fonts in a variety of styles help make your document more attractive and themed. New fonts can be found both in collections and as individual samples. They can be burned to discs or offered in a wide variety on the Internet. After finding a suitable font, the user will need to load it into Corel.

Instructions
Step 1
Fonts for text and image editors are loaded in the same way. The fact is that almost all programs that provide text input, when choosing a font style, refer to the same files on the computer. Therefore, it doesn't matter which application you want to download fonts for: CorelDRAW, Adobe Photoshop, or Paint.net.
Step 2
If you downloaded the fonts from the Internet as an archive, unpack the files from it into a separate folder. Remember the directory where you saved them. The fonts in your folder must have a.ttf or.otf extension. On discs with collections, fonts, as a rule, are already ready for installation and do not require additional preparatory actions from the user.
Step 3
There are several ways to install fonts. First way: go to the folder where your fonts are saved. Select the desired font with the left mouse button and copy it to the clipboard in any of the available ways (using the right mouse button, keyboard keys or commands in the top menu bar of the folder).
Step 4
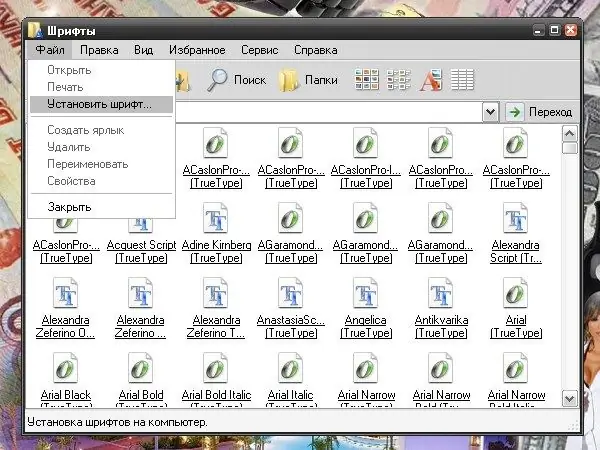
Through the "Start" menu, call the "Control Panel". In the Appearance and Themes category on the left side of the window, in the See also "right-click on the link" Fonts "- a new window will open. If the "Control Panel" has a classic look, select the "Fonts" icon immediately. Right-click anywhere in the window and paste the fonts you just copied from the clipboard into the Fonts folder.
Step 5
Another way: open the "Fonts" pack using the method described in the fourth step. From the File menu, choose Install Font. In the Add Fonts dialog box that opens, select the drive where you saved your fonts. In the "Folders" field, double-click the left mouse button on the folder that contains the fonts.
Step 6
In the Font List box, select the font you want to add. If you want to add the entire collection of fonts in the folder, click on the "Select All" button. Click on the OK button in the upper right corner of the window. The selected fonts will be added. Launch Corel and style the text to your liking.
Step 7
Some newer versions of CorelDRAW have had problems with the correct display of fonts. To correct this situation on the Internet, you can find a utility that helps the editor to "read" the font correctly. When working with this tool, the font is loaded in the window of the program itself. If you have installed the utility, follow the instructions for working with it.


