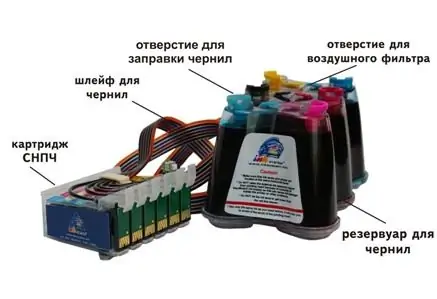
Continuous Ink Supply System - An inkjet printer that supplies ink to the print head from refillable reservoirs. Thanks to this system, printing costs are significantly reduced and the user gains savings in the thousands of percent. Let's consider the process of installing CISS using the example of an EPSON printer.

Instructions
Step 1
The containers used in the continuous ink supply system must be filled with ink of the color indicated on each bottle and container. Be careful not to mix up colors in order to avoid incorrect color mixing later.
Step 2
Using a syringe, evacuate air from all cartridges one at a time through the outlet, while tilting the containers 45 degrees. Evacuating the air will create a vacuum in the cartridges and they will fill with ink.
Step 3
Unplug the printer, remove the cartridges installed on it. After removing the cartridges, remove the cartridge cover to install the system. Insert the cartridges connected to the CISS into the printer carriage. Place the tubing ribbon over the cartridges and attach the tubing stand to the second Cyan cartridge from the left, adjust the tubing length accordingly. The length is optimal if, when moving the carriage to the left and right until it stops, the train does not hang down and does not interfere with the movement of the carriage.
Step 4
The external ink tanks must be installed flush with the printer. Connect the printer to your computer and plug it into an electrical outlet. Just like when changing ink cartridges, the printer will automatically clean the print head nozzles. When the cleaning process is complete, send a test page to the printer. If some nozzles do not print completely (banding is observed), then clean the print head nozzles using the printer driver options, let it sit for 40-60 minutes and print a test page again. You may have to repeat these steps 2-3 times to completely remove air from the print head.


