Many office applications, even the Microsoft Word word processor, allow you to perform various image manipulations. However, it is better to use a graphics editor for this - it has more options for changing the picture, and the interface is designed to work with graphics and therefore is not overloaded with unnecessary functions. In the Windows operating system, this program - MS Paint - is installed by default.

Necessary
Graphic editor MS Paint
Instructions
Step 1
Start the graphics editor. In Windows 7 or Vista, you can do this by pressing the Win key, typing paint and pressing Enter. In Windows XP, you will have to look for a link to launch the application in the "Standard" section of the "All Programs" section of the main menu of the system.
Step 2
Load the original picture into the graphic editor. To do this, use a dialog called by the Ctrl + O keyboard shortcut or by choosing the "Open" command in the application menu.
Step 3
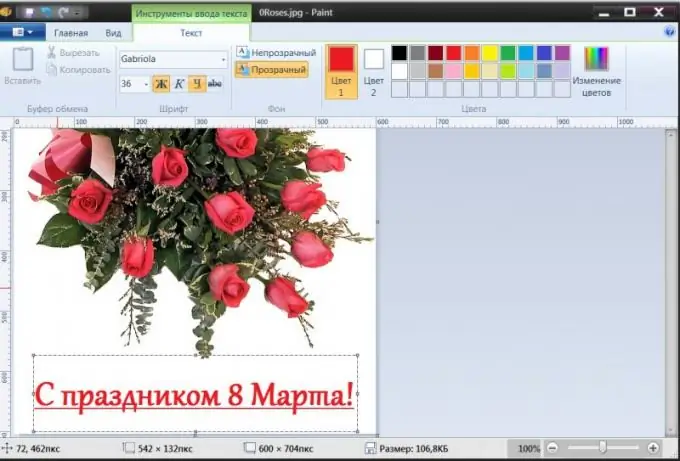
Turn on the "Text" tool - click on the icon with the letter "A" in the "Tools" section of the "Home" tab. Click on the place of the picture where the first letter of the created inscription should be, and a dotted frame with a blinking input cursor inside will appear on the image. Paint will add another tab with tools to the menu - "Text".
Step 4
Type the text for the label. If it has already been created in a text editor or copied from another document, you can use the "Paste" button on the "Text" tab or the keyboard shortcut Ctrl + V instead of manual typing. When the entered text no longer fits in the width of the frame, the editor will wrap the words to the next line. You can change the width of the text column by dragging the anchor points on the dotted frame.
Step 5
If you need to change the color, size, style of the letters of the inscription, select it completely or only the required fragment and use the controls from the sections "Font", "Background" and "Colors" in the menu of the graphic editor. After these changes, adjust the final position of the text relative to the image using the anchor points on the frame around the text.
Step 6
Click on the image outside the frame to turn off the text editing mode and save the picture with the caption - the corresponding dialog is invoked by selecting the "Save" or "Save as" items in the Paint menu.


