Disabling the autorun function is sometimes necessary not only so that the window that opens does not interfere with work, but also to protect the computer from malware and viruses contained on removable media.

Instructions
Step 1
Insert the USB stick into the appropriate connector on your computer. You will see an autorun window - check the box "Do not perform any actions" and click "OK".
Step 2
If the previous point did not help, use the next method. Open the "Run" item through the "Start" menu. Type gpedit.msc at the prompt and press Enter. Next, open the computer configuration, then the "Administrative Templates" tab. Go to system settings and disable autorun.
Step 3
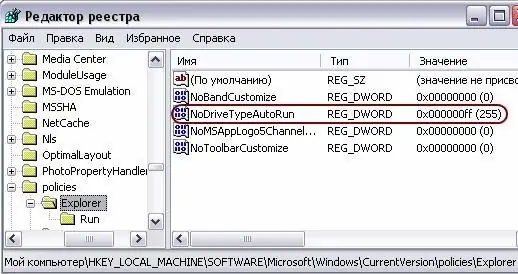
Try another way. Open the "Start" menu, select "Run", type regedit in the line. Open the HKLM branch, then Software, Microsoft, Current Version, Policies. Create a new section in this directory.
Step 4
Rename the section you created in the Explorer section and here create a key named NoDriveTypeAutoRun, assign it one of the following values:
0x1 - disable automatic start of drives of type unknown to the system;
0x4 - disable automatic launch of removable USB devices;
0x8 - disable automatic start of non-removable devices;
0x10 - disable automatic startup of network drives;
0x20 - disable automatic start of the CD drive;
0x40 - disable automatic launch of RAM disks;
0x80 - disable automatic start on drives of unknown types;
0xFF - disable automatic start of all disks in general.
Step 5
Use the function to disable autorun of devices that are assigned a predefined letter in the computer. To do this, reopen the operating system registry, open the KLM / SOFTWARE / Microsoft / Windows / CurrentVersion / Policies / Explorer directory.
Step 6
Select the creation of a new key there, insert the value 0x0-0x3FFFFFF into it. The letter on the far right corresponds in binary representation to drive A, the second to B, the third to C, and so on. For that. the bit must be set for the changes to take effect.


